Before your gazebo boxes arrive, check your local regulations and property lines to prevent issues. Measure your available space carefully, making sure it’s level and free of obstructions like rocks, roots, or debris. Gather all tools and materials needed for assembly, and plan your groundwork by clearing and leveling the area. Confirm the best location for sunlight, wind, and accessibility. Staying prepared now helps ensure a smooth setup—continue to discover more helpful tips ahead.
Key Takeaways
- Confirm the installation site is level, free of debris, and has proper drainage.
- Measure and mark boundary lines accurately to ensure correct placement.
- Check local regulations and permit requirements for gazebo installation.
- Gather all necessary tools, hardware, and materials before delivery.
- Clear the area of obstructions, rocks, roots, and landscape debris for a smooth setup.

Safly Fun Heavy Duty Trampoline Stakes Anchor Kit, Spiral Ground Anchors with Straps & Installation Tool, Secure for Trampoline, Tent, Canopy, Gazebo, Dog Tie-Out (4-Pack)
Strong Trampoline Stakes – Heavy-duty spiral trampoline stakes twist deep into the ground for maximum grip, keeping trampolines…
As an affiliate, we earn on qualifying purchases.
As an affiliate, we earn on qualifying purchases.
Prepare Your Yard for Gazebo Installation
Before you begin installing your gazebo, it’s important to prepare your yard properly. Start by clearing the area of debris, weeds, and uneven patches to guarantee a stable foundation. Consider your landscaping ideas—think about how the gazebo will complement existing plants, pathways, or lawn features. Level the ground and mark the exact spot for placement, making adjustments as needed for ideal sunlight and shade. Incorporate outdoor lighting ideas, like string lights or solar lanterns, to enhance the space’s ambiance and functionality. Proper preparation helps prevent future issues and creates a welcoming environment. Taking these steps ensures your gazebo fits seamlessly into your yard, creating a beautiful, functional outdoor space you’ll enjoy for years to come.

Red Rotary Laser Level 2000ft, 360 Degree Self Leveling Laser Level Kit with Receiver Remote Control and Surveying Tripod 16.4ft Staff, 5 Rotation Speeds& 4 Angles Adjustment,IP66 Waterproof.
High-Precision Red Laser Accuracy:Achieve dependable measurements with ±1/8 inch accuracy at 100 feet using this Class II red…
As an affiliate, we earn on qualifying purchases.
As an affiliate, we earn on qualifying purchases.
Check Local Regulations and Property Lines

Checking your local regulations and property lines is a vital step before installing your gazebo. Start by reviewing local zoning laws to verify your planned structure complies with setback requirements and size restrictions. Visit your city or county’s planning department website or contact them directly for specific rules. Knowing your property boundaries helps prevent accidental encroachment on neighbors’ land and avoids future disputes. Use a property survey or markers to confirm your lot lines accurately. Some areas have restrictions on structures near property boundaries or require permits for gazebos. Failing to check these regulations can result in fines, modifications, or removal. Taking the time now saves you headaches later and guarantees your gazebo installation aligns with local zoning laws. Additionally, understanding building codes ensures your structure meets safety standards and minimizes the risk of future compliance issues. Being aware of property line markers can further help you avoid encroachment problems during installation. Moreover, considering local regulations on electric or gas-powered tools can help you stay compliant if you plan to use power equipment during assembly. Consulting with local authorities about special permits or restrictions can also prevent unexpected delays.
gazebo permit and regulation guide
As an affiliate, we earn on qualifying purchases.
As an affiliate, we earn on qualifying purchases.
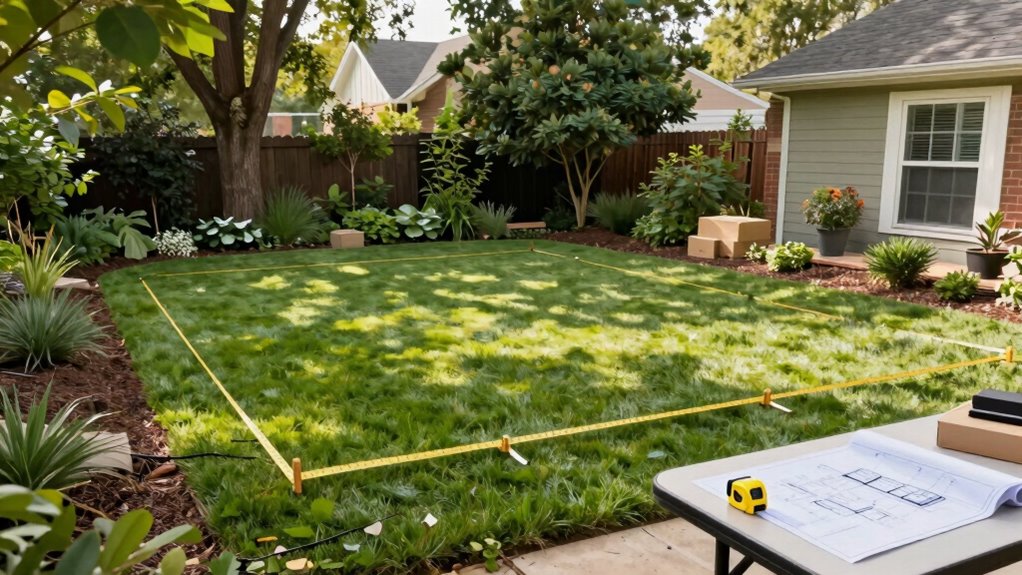
Measure Your Available Space Accurately

Ensuring you measure your available space accurately is crucial for a successful gazebo installation. Start with a thorough dimensions check of the area where you plan to place the gazebo. Use a tape measure to determine the length and width, making sure to account for any obstructions or uneven ground. It’s also important to measure the height clearance, especially if you’re installing a larger structure. Accurate space measurement helps you confirm that the gazebo will fit comfortably and allows for proper clearance around it. Don’t forget to check for nearby features like trees, pathways, or existing structures that could impact placement. Taking precise measurements now prevents surprises later and ensures your new gazebo fits perfectly into your outdoor space. Proper space planning and measurement techniques are essential to avoid costly adjustments after delivery. Additionally, understanding site conditions such as soil stability and drainage can influence your placement decisions and help prevent future issues. Being aware of climate considerations can also guide you in choosing the best location to withstand local weather patterns. Conducting a drainage assessment prior to installation can further safeguard your gazebo against potential water damage or erosion.

Garden Tutor Multiscale Garden & Landscape Design Kit – 2 Translucent Yellow Design Stencils, 12-Inch Flexible Curve Ruler, 40-Sheet Multi-Scale Graph Paper & Garden Design Guide
All-in-One Garden & Landscape Planning: Includes two multi-scale design templates, a 12-inch flexible curve drafting ruler, custom landscape…
As an affiliate, we earn on qualifying purchases.
As an affiliate, we earn on qualifying purchases.
Gather Your Tools and Materials Needed

Gathering your tools and materials is a vital step to keep your gazebo project on track. Start with a tools checklist that includes a drill, screwdriver, level, tape measure, and hammer. Having these on hand guarantees you can assemble efficiently and accurately. Material preparation is equally important—organize all parts, fasteners, and hardware before starting. Double-check that you have the right quantities and sizes to avoid delays. Clear a workspace where you can lay out everything and work comfortably. Preparing your tools and materials in advance minimizes interruptions once the delivery arrives. Additionally, understanding the contrast ratio of your projector can help you optimize your viewing environment for the best image quality. Familiarizing yourself with essential DIY tools and safety tips ensures you handle equipment properly and avoid accidents during assembly. Being well-equipped with the right solar panels and accessories can also streamline your setup process, especially if integrating solar-powered lighting or security solutions. Conducting a site assessment beforehand helps identify the best location for installation, ensuring stability and accessibility. Proper planning of construction procedures can save you time and prevent mistakes during assembly. This preparation helps guarantee a smooth, hassle-free assembly process, saving you time and frustration. Being well-equipped with the right tools and materials sets the foundation for a successful gazebo installation.
Plan and Prepare the Ground and Base
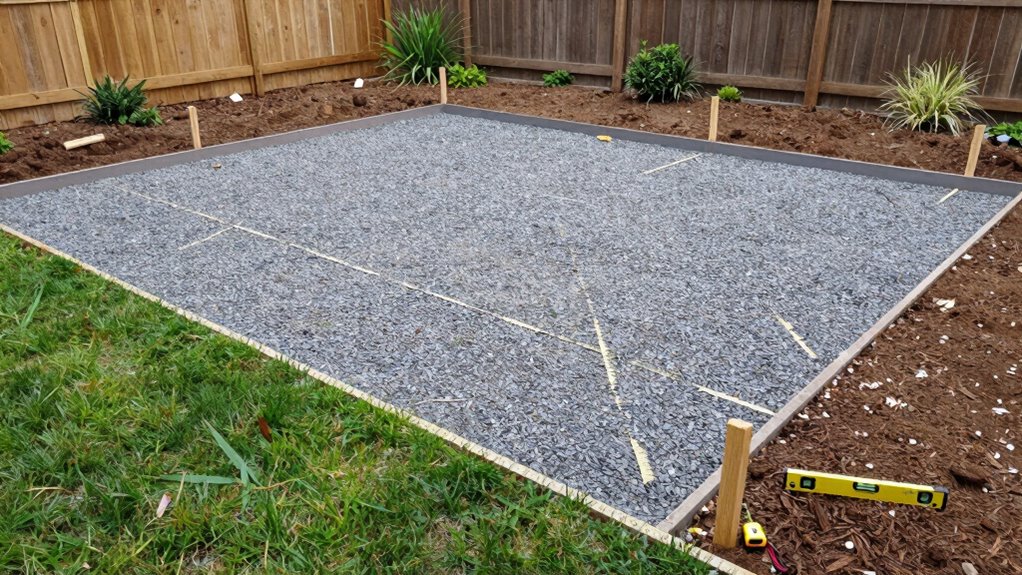
Before you start assembling your gazebo, it’s important to properly plan and prepare the ground and base. First, check for ground stability; the surface needs to be level and firm to support the structure safely. Clear away any debris, rocks, or vegetation that could cause unevenness. Consider adding a layer of gravel or a solid foundation like concrete pavers to improve surface preparation. Ensure the area is flat to prevent wobbly or unstable installation. If the ground isn’t naturally stable, take steps to reinforce it, such as compacting soil or laying a base material. Proper surface preparation guarantees your gazebo remains sturdy and lasts longer, providing a safe, stable foundation for your outdoor space. Assessing foundation strength is crucial to ensure long-term durability and safety. Additionally, understanding soil stability helps determine the most effective foundation options for your specific site conditions. Knowing how soil composition influences foundation choices can make a significant difference in the stability of your gazebo. Taking the time to evaluate ground conditions thoroughly can help prevent future issues with settling or shifting. Conducting a site assessment can further ensure your chosen location is suitable for installation.
Choose the Best Location for Your Gazebo

Choosing the right spot for your gazebo is vital to maximize its functionality and enjoyment. Think about your landscape design—place it where it complements existing features and enhances your yard’s flow. Consider how the location fits into your overall outdoor aesthetic and accessibility. Weather considerations are also essential; pick a spot that offers some protection from harsh sun, wind, or heavy rain. Avoid low-lying areas prone to flooding or excessive moisture, and steer clear of shaded spots that might trap dampness. A well-chosen location ensures your gazebo remains a comfortable, inviting retreat year-round. Additionally, evaluate site drainage to prevent water accumulation around the foundation, ensuring stability and longevity. Proper landscape planning can help you visualize how the space will be used and how it integrates with your landscape, so you can select the best spot for long-term satisfaction. Considering solar exposure can also help you determine whether the area will benefit from natural sunlight, especially if you plan to incorporate solar-powered features or lighting. Making sure the area has good accessibility will also make it easier to enjoy your gazebo regularly. Furthermore, assessing wind patterns can help prevent strong gusts from affecting your gazebo’s comfort.
Clear and Level the Installation Area

Before installing your gazebo, you need to prepare the area thoroughly. Check that the surface is even, and clear away any obstructions or debris. Use stakes or markers to outline the foundation boundaries to make certain of proper placement.
Check Surface Evenness
Ensuring the installation area is clear and level is vital for a stable gazebo. Check the ground surface for uneven terrain, as any dips or high spots can cause instability later. Walk around the area to identify spots that aren’t flat, and use a level or straightedge to assess surface evenness. If you notice dips or high points, you’ll need to correct them before proceeding. Filling low areas with gravel or soil and compacting them helps create a solid, level base. Removing rocks, roots, or debris that could cause unevenness is also essential. Taking these steps ensures your gazebo will sit evenly and securely, preventing future shifting or instability. A flat, smooth ground surface makes assembly easier and guarantees long-term stability.
Remove Obstructions and Debris
Clear the installation area of any obstructions and debris to create a safe, level surface for your gazebo. Remove landscape debris such as rocks, sticks, and leaves that could interfere with the foundation. Check for pet obstructions like toys, bowls, or scattered bedding that might cause tripping hazards or uneven footing. Clearing these items guarantees a smooth setup process and prevents damage to your gazebo’s base. Additionally, level the ground by raking or adjusting soil to eliminate dips or mounds. A clean, flat surface helps with proper assembly and stability. Taking the time to clear and level now saves you effort later, reducing risk and ensuring your gazebo stands securely once installed.
Mark Foundation Boundaries
To properly mark your gazebo’s foundation boundaries, start by measuring the designated area with a tape measure, verifying it matches the size specified in the installation instructions. Use stakes and string to mark the outline, clearly defining the boundaries. Check property lines to confirm you’re within your property and avoid encroaching on neighboring land. Mark boundary points at each corner to create a precise perimeter. This step ensures your gazebo fits comfortably and complies with any local regulations. Once boundaries are marked, double-check measurements and property line references to prevent future disputes. Clearing the area around these marks helps maintain accuracy. Accurate boundary marking provides a clear, level foundation and simplifies the installation process.
Review Assembly Instructions and Create a Timeline
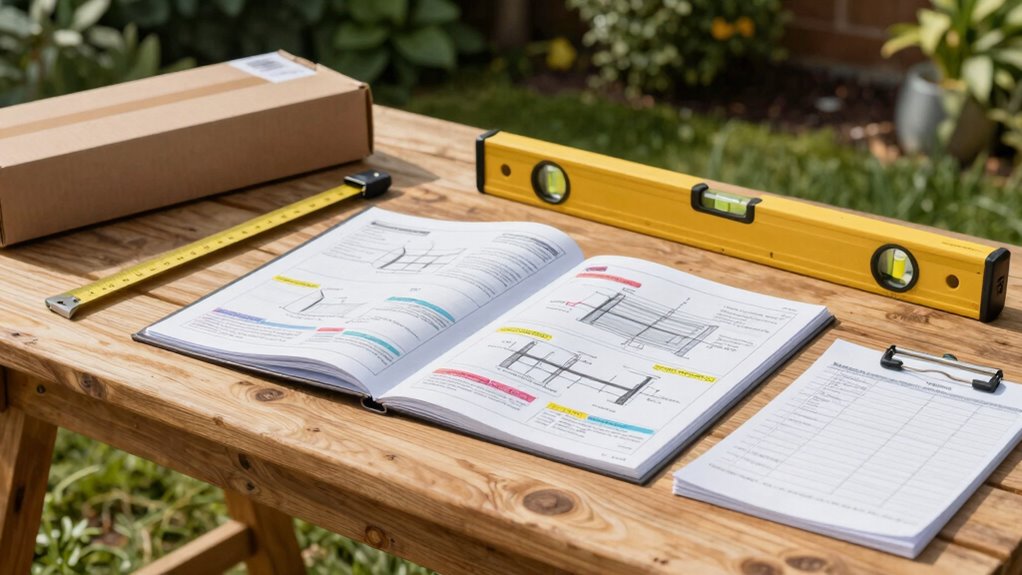
Before you start assembling your gazebo, take the time to thoroughly review the manufacturer’s instructions. An instruction review helps you understand each step and avoid surprises during assembly. Create an assembly timeline to structure your work efficiently. To visualize, consider this simple plan:
| Step | Time Estimate |
|---|---|
| Unpack & check parts | 30 minutes |
| Read instructions | 15 minutes |
| Assemble framework | 2 hours |
| Final adjustments | 30 minutes |
This timeline keeps you on track and ensures no detail gets overlooked. Break down the assembly process into manageable segments, allowing for smoother progress. By preparing a clear plan, you’ll reduce stress and streamline the entire setup.
Ensure You Have Everything Ready for a Smooth Installation
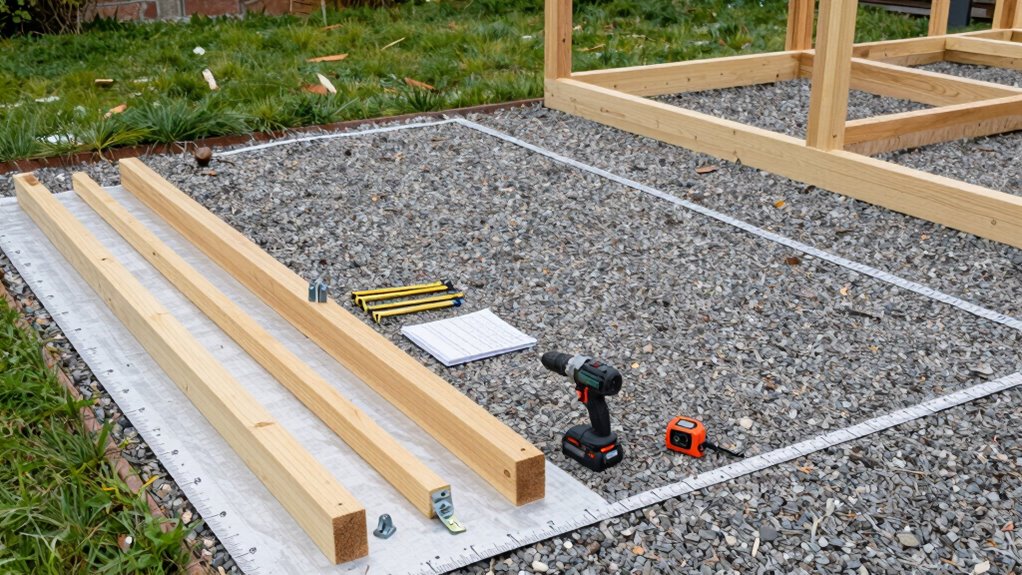
Ensuring you have all the necessary tools and materials before starting the assembly process can save you time and frustration. Double-check your toolkit for screwdrivers, wrenches, and levelers. Review your furniture selection to identify what pieces you’ll need, like chairs or tables, and gather any accessories, such as cushions or decorative elements. Consider your lighting options now—whether you plan to install outdoor lights, string lights, or lanterns—and have them ready to install. Having everything on hand prevents delays and makes the setup smoother. Make certain you have adequate power sources or batteries for lighting. Preparing these details in advance ensures your gazebo will be inviting and functional from the moment it’s assembled, giving you a hassle-free installation process.
Frequently Asked Questions
How Long Does Gazebo Installation Typically Take?
Gazebo installation usually takes about one to three days, depending on your foundation preparation and weather conditions. If you’ve already leveled the ground and set a solid foundation, the process speeds up. However, rain or high winds can cause delays, so it’s best to plan for good weather. Ensuring your site is prepared beforehand helps streamline the installation, saving you time and effort.
Can I Install a Gazebo on Uneven Ground?
Think of your uneven ground as a ticking time bomb for your gazebo. You can install it on uneven ground, but only if you perform proper ground leveling to guarantee foundation stability. Use shims or gravel to create a flat, solid surface. Skipping this step risks structural issues and safety hazards later. Prioritize a level foundation for a secure, long-lasting gazebo—your future relaxation spot deserves it!
What Permits Are Required for Outdoor Structures?
You need to check local building codes and zoning regulations before installing your outdoor structure. Contact your city or county office to find out if permits are required for gazebos or similar structures. Some areas may have restrictions based on size, height, or location. Obtaining the necessary permits guarantees your project complies with legal standards, preventing future issues or fines. Always verify these requirements early to avoid delays.
Do I Need Special Tools for Assembly?
You usually don’t need special tools for assembly, but having basic tools like a screwdriver, wrench, and hammer helps. Check the instructions to see if any specific tools are recommended, especially if the gazebo includes unique parts. While assembly skills can vary, most kits are designed for straightforward setup, so if you’re comfortable with basic DIY tasks, you’ll likely handle it well. Preparing these tools in advance makes the process smoother.
How Should I Maintain My Gazebo After Installation?
To keep your gazebo looking like a royal retreat, follow simple maintenance tips and cleaning routines. Regularly wash it with mild soap and water, and check for loose bolts or damage. Cover it during harsh weather to prevent rust and wear. Keep the roof clear of debris, and inspect the frame periodically. These easy steps guarantee your gazebo remains a stunning centerpiece for years to come.
Conclusion
Did you know that proper prep can cut gazebo installation time by up to 50%? By checking local regulations, measuring your space, and preparing the ground beforehand, you set yourself up for a smooth build. Skipping these steps can lead to delays or costly mistakes. Take the time to plan carefully now, and you’ll enjoy your new outdoor oasis sooner—and with less stress. Happy building!