Set up compatible smart home devices and create a basic automation, such as turning on a lamp at sunset or switching off lights when you leave home. This guide is for beginners who can use a smartphone app and access their home Wi-Fi settings. Allow 45-90 minutes for setup and testing; the exact time depends on your devices and network.

Get furniture and decor delivered free with Prime
- Fast, free delivery on millions of items
- Prime Video, Amazon Music and more included
- Member-only deals all year

Echo Hub (8") – Redesigned with customizable control and Alexa+
- ✔ Display: 8-inch touchscreen, 1280 × 800
- ✔ Smart home connectivity: Wi-Fi, Bluetooth LE Mesh, Zigbee, Thread, Matter, Amazon Sidewalk
- ✔ Power options: USB-C PD, optional PoE+ or PoE++

Aqara Smart Home Hub M3 for Advanced Automation, Matter Controller, IR
- ✔ Model: HM-G01E
- ✔ Zigbee support: Up to 127 Aqara Zigbee devices
- ✔ Thread support: Up to 127 devices; repeaters required
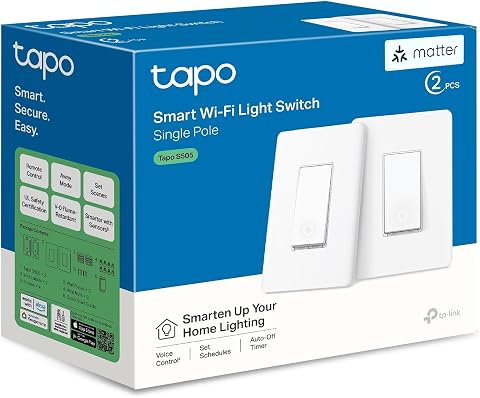
TP-Link Tapo S505 Matter Smart Light Switch, 2-Pack
- ✔ Model: Tapo S505
- ✔ Quantity: Two switches
- ✔ Switch type: Single-pole, one-way
Difficulty: Beginner | Time: 45-90 minutes
What You’ll Need
Tools & Materials:
- Smart home devices and any required hubs or bridges
- A smartphone or tablet with each device maker’s app
- Access to your home Wi-Fi network name and password
- A compatible smart home platform app, if you plan to control devices from one place
Knowledge:
- How to install apps and connect a phone to Wi-Fi
- How to follow the device maker’s installation and safety instructions
Check each device’s packaging or product page for its required Wi-Fi band, hub, platform, and operating system. Keep the phone connected to the home network during setup. Install plug-in or battery-powered devices yourself only as the maker directs. Leave hardwired electrical work to a qualified electrician.
Echo Hub (8") – Redesigned with customizable control and Alexa+
The Echo Hub is our leading choice when automation needs to be easy to see and operate across a household. Its 8-inch touchscreen lets us arrange and resize device controls, check cameras and launch routines from a single wall-mounted spot or stand. That visible dashboard distinguishes it from the Aqara M3, which focuses on coordinating devices behind the scenes, and from the Tapo S505, which adds control at a particular light switch rather than providing a household overview.Its range of Zigbee, Thread, Matter, Wi-Fi and Bluetooth LE Mesh support gives it a useful role as a control center for a mixed-device home. Wall mounting and optional PoE can also make it feel like a permanent part of the room, while the included power adapter offers a simpler starting point. The compromise is that this is not a portable panel: moving it or making the installation especially tidy can require extra accessories. Some Bluetooth device profiles are unsupported, too, so broad protocol coverage should not be mistaken for universal compatibility.Privacy and placement deserve consideration before choosing it. The Hub has a microphone-off button and uses recycled materials, but it is still a screen and speaker-based device intended to live in a fixed location. Compared with the camera- and microphone-free Aqara M3, it offers more visible interaction but a different privacy profile. We would choose it when household members benefit from a shared dashboard; for invisible local automation or a straightforward lighting upgrade, the other two picks are more targeted.
Pros:
- Customizable touchscreen dashboard puts device controls and routines in one visible place.
- Supports Wi-Fi, Zigbee, Thread, Matter and Bluetooth LE Mesh for a broad mix of compatible devices.
- Can be wall-mounted or used on a stand, with optional PoE for a cleaner fixed installation.
- Includes a microphone-off button and is constructed with recycled materials.
Cons:
- Not designed for handheld or portable use.
- PoE and in-wall cable pass-through require separate accessories.
- Does not support certain Bluetooth profiles and PIN-code devices.
Best for: Households that want a shared, customizable touchscreen for routines, cameras and controls across a mixed smart home.
Not ideal for: People who need a portable controller, prefer a hub without a screen or speakers, or want to avoid buying installation accessories for a tidy PoE setup.
Bottom line: Choose the Echo Hub for the strongest blend of broad device control and an at-a-glance automation dashboard, as long as a fixed screen suits your home.
“Choose the Echo Hub for the strongest blend of broad device control and an at-a-glance automation dashboard, as long as a fixed screen suits your home.”
Aqara Smart Home Hub M3 for Advanced Automation, Matter Controller, IR
The Aqara Smart Home Hub M3 is the specialist pick for a household investing in Aqara sensors, switches and other devices. It can connect up to 127 Aqara Zigbee devices and 127 Thread devices, with repeaters needed for the Thread network, and adds local Edge automation. That makes it more focused on coordinating compatible devices than the Echo Hub’s screen-centered approach. The Echo is easier to use as a shared control surface; the M3 is better suited to routines that should run through a dedicated hub.One unusual advantage is its 360-degree smart IR blaster with status feedback, which can bring certain infrared-controlled equipment, including air conditioners, into an automation setup. The M3 also supports Matter bridging, Wi-Fi, Bluetooth and PoE, with USB-C as another connection option. It has 8 GB of encrypted local storage and no microphone or camera, making its privacy design distinct from the Echo Hub. Buyers should still verify their intended devices and integrations: only one AC device can be exposed to Matter at a time.The main constraint is clear and consequential: its Zigbee support is for Aqara products only, unlike the Echo Hub’s broader collection of protocols and compatible devices. That limitation makes the M3 a less flexible starting point for a mixed-brand Zigbee home, even though Matter and Thread broaden its options. Compared with the Tapo S505, it can coordinate a wider set of automations but requires building around a hub. We recommend it when local Aqara routines and IR control are central to the plan, not as a generic bridge for every Zigbee device.
Pros:
- Supports local Edge automation to reduce dependence on cloud services.
- Combines Aqara Zigbee, Thread, Matter, Wi-Fi, Bluetooth, USB-C and PoE connectivity.
- 360-degree IR control with status feedback can bring compatible AC equipment into routines.
- No camera or microphone; includes 8 GB encrypted local storage.
Cons:
- Zigbee device support is limited to Aqara products.
- Only one AC device can be exposed to Matter at a time.
- Thread capacity requires repeaters.
Best for: Aqara users who want local automations, a Matter bridge, Thread support and infrared control in one dedicated hub.
Not ideal for: Buyers who expect to pair third-party Zigbee devices or want a visible touchscreen control panel instead of a hub working in the background.
Bottom line: The M3 is a capable local automation hub for Aqara-centered homes, but its Zigbee boundary makes it a poor universal hub for mixed-brand systems.
“The M3 is a capable local automation hub for Aqara-centered homes, but its Zigbee boundary makes it a poor universal hub for mixed-brand systems.”
TP-Link Tapo S505 Matter Smart Light Switch, 2-Pack
The TP-Link Tapo S505 takes a different route to automation: instead of managing a collection of devices through a hub or dashboard, it makes ordinary lights controllable at the switch. This two-pack is a practical fit when the desired routine is specific, such as scheduling lights or using voice control without replacing every bulb. Matter support allows it to work with Apple Home, Alexa, Google Home and SmartThings, giving it broader platform choice than a device tied to one assistant.For day-to-day reliability, local network control can continue when internet access is unavailable. App-guided setup, touch control, timers and schedules cover the essentials, while Multi-Admin support can let more than one Matter platform manage the device. Compared with the Echo Hub, the S505 is less useful for seeing and controlling an entire home from one place. Compared with the Aqara M3, it offers a simpler path to automating a lighting circuit, without asking the buyer to build an Aqara hub ecosystem.Installation is the deciding factor. The switch needs a neutral wire, 2.4 GHz Wi-Fi and a single-pole circuit, so it will not suit every wall box or multi-way lighting arrangement. It is also a focused device, not a replacement for a hub when the goal is coordinating sensors, locks or other equipment. We would put it first for a straightforward lighting job if the wiring is compatible; for broader automation, the Echo Hub or M3 provides more room to connect different device types.
Pros:
- Matter compatibility spans Apple Home, Amazon Alexa, Google Home and Samsung SmartThings.
- Local network control can continue without internet access.
- App setup, touch and voice control, scheduling and timers cover common lighting routines.
- Two switches provide a focused way to automate more than one lighting circuit.
Cons:
- Requires neutral wiring and 2.4 GHz Wi-Fi.
- Designed for single-pole, one-way installations.
- Controls lighting circuits rather than acting as a general-purpose smart home hub.
Best for: Homeowners or renovators with neutral wiring who want to automate standard single-pole lights across Matter-compatible platforms.
Not ideal for: People with no neutral wire, multi-way lighting circuits, or a goal of coordinating many device types through one hub.
Bottom line: Choose the Tapo S505 for direct, cross-platform lighting automation when your wiring fits; it is the most focused option in this lineup.
“Choose the Tapo S505 for direct, cross-platform lighting automation when your wiring fits; it is the most focused option in this lineup.”
As an Amazon Associate we earn from qualifying purchases.
Before You Start
Choose one small task for your first automation and identify the devices it needs. For example, a sunset lighting routine needs a compatible smart light or plug and a location setting in the app. Confirm that the device will be within Wi-Fi or hub range where you intend to use it. Do not share account passwords, Wi-Fi credentials, or access codes with people who do not need them.
Step-by-Step Instructions
Step 1: Choose a simple automation
Write down the event that should start the automation, the device action, and when it should run. For example: “At sunset, turn on the living room lamp.” Start with one trigger and one action so you can tell which part needs fixing if it fails.
Tip: Pick a routine you can observe while setting it up, such as turning a light on at a scheduled time.
Check: You can state the trigger, action, and schedule in one sentence.
Step 2: Check device and platform compatibility
Read the setup requirements for each device. Confirm its Wi-Fi band, hub or bridge needs, supported app, and compatibility with the platform you intend to use. If devices require separate maker apps, install those first; add them to a shared platform only if the manufacturers support it.
Tip: A device that uses a different Wi-Fi band or requires a hub may not appear during setup until that requirement is met.
Check: You know which app and network or hub each device needs.
Step 3: Install the maker’s app and sign in
Download the official app listed in the device instructions. Create or sign in to an account, then grant only the permissions needed for the features you plan to use. Location access may be needed for arrival, departure, or sunrise and sunset routines.
Tip: Use a unique account password. Turn on multifactor authentication if the service offers it.
Check: The app opens to your account and displays its device setup option.
Step 4: Power and prepare the devices
Place each device where you plan to use it, then connect power or batteries as directed. Put hubs near the router and power them on before pairing devices that depend on them. Follow the maker’s safety instructions and do not open or modify electrical equipment.
Tip: Pair devices near the router or hub first. Move them to their final locations after setup if the maker allows it.
Check: Each device powers on and shows the setup or pairing state described in its instructions.
Step 5: Connect each device to the network
In the maker’s app, choose the option to add a device and follow the prompts. Select the correct Wi-Fi network, enter its password, and wait for the app to finish pairing before starting another device. Give each device a clear name that identifies its room and function, such as “Kitchen ceiling light.”
Tip: If the app asks you to join a temporary device network, return to the app after joining it so setup can continue.
Check: The device appears in the app as online and responds to a manual on/off or status check.
If you want one place to control devices, open the platform app and use its add-device or link-service option. Follow the prompts to connect the maker account or scan the device’s setup code. Confirm that the platform lists the devices before creating a routine.
Tip: Some devices work only in their maker’s app. Check compatibility before repeating pairing or resetting a device.
Check: The compatible device appears in the platform app with the same room and name you assigned.
Step 7: Create the automation
Open the app’s automation, routine, or scene section and create a new routine. Set the trigger you chose, such as a schedule or sunset, then select the device and action. Set any available conditions, such as weekdays only, and save the routine.
Tip: Check the time zone, location, and schedule settings. A sunset trigger may need location permission and can shift each day.
Check: The saved routine shows the intended trigger, device, action, and schedule.
Step 8: Test the routine and adjust it
Use the app’s test or run option if available. Otherwise, temporarily set a near-term schedule and watch the device at the scheduled time. Confirm that the correct device responds, then restore the intended schedule and test any conditions you added.
Tip: Change one setting at a time if the routine behaves incorrectly. This makes the cause easier to identify.
Check: The intended device performs the expected action when the trigger occurs.
Common Mistakes to Avoid
- Trying to pair a device before meeting its network or hub requirements. — Check the product’s setup requirements first, including Wi-Fi band and any required hub or bridge.
- Using vague device names that are hard to distinguish in a routine. — Name devices by room and function, then check the selected name before saving each automation.
- Building a routine with several triggers, conditions, and actions at once. — Start with one trigger and one action. Add complexity only after the basic routine works.
- Leaving a temporary test schedule in place. — After testing, check the routine’s schedule and restore the time or event you actually want.
Troubleshooting
Problem: The app cannot find the device.
Solution: Check that the device has power and is in pairing mode. Confirm that your phone is on the required Wi-Fi network and that any required hub is online. Restart setup using the maker’s instructions.
Problem: Pairing fails after you enter the Wi-Fi password.
Solution: Recheck the password and network band requirements. Move the device closer to the router, temporarily disable any phone setting that switches networks automatically, and try again. Use the maker’s reset procedure only if the device remains unpaired.
Problem: The device appears offline after setup.
Solution: Check its power, router connection, and hub status. Move it closer to the router or hub to test signal range, then restart the device and app. If it reconnects nearby, adjust its final placement.
Problem: The automation saves but does not run.
Solution: Confirm the routine is enabled and check its time zone, schedule, location permission, and conditions. Run it manually if the app supports that option, then test again with a near-term trigger.
What Success Looks Like
Your devices appear online in their apps, have recognizable names, and respond to manual controls. The saved automation shows the right trigger, device, action, and schedule, and a test run produces the expected result. If the trigger depends on location or a time event, confirm those settings are present and test the routine again when that event occurs.
Next Steps
Use the setup for a few days and adjust the schedule or device placement if it does not fit your routine. Add another device or condition only after the first automation runs reliably. Review account access and app permissions periodically, and install device or hub updates through the maker’s app. Keep setup instructions and reset steps somewhere you can find them if you change your router or replace a device.
Frequently Asked Questions
Do all smart home devices work with the same app?
No. Some devices work only in the maker’s app, while others also support shared platforms. Check compatibility before buying or trying to link accounts.
Do I need a smart home hub?
Only if the device requires one or if you want features that depend on it. Check the device’s setup requirements; some connect directly to Wi-Fi.
Why does a device need my location?
Location access can support routines based on arrival, departure, sunrise, or sunset. Grant it only when you plan to use those features, and review the app’s permission settings.
What should I do if I change my Wi-Fi router?
Check the maker’s instructions for updating the network. Some devices let you change Wi-Fi settings in the app; others require setup again. Keep the old network active until you know how each device reconnects.