To prepare surfaces for painting, you should start by thoroughly cleaning to remove dirt, grease, and dust, ensuring proper adhesion. Next, repair any holes or cracks, then sand glossy or rough areas to create a smooth surface. Applying a suitable primer helps paint stick better and last longer, especially on challenging surfaces. When these steps are done, you’ll achieve a professional, long-lasting finish—continue to learn more about perfecting your surface prep techniques.
Key Takeaways
- Clean the surface thoroughly with a damp cloth or cleaner to remove dirt, dust, and grease before painting.
- Inspect for cracks, holes, or peeling paint; repair and sand smooth for a flawless finish.
- Use appropriate primers based on the surface type and paint to promote adhesion and durability.
- Lightly sand glossy or rough areas to improve paint grip and create a smooth surface.
- Remove dust after sanding with a tack cloth or vacuum to ensure a clean, paint-ready surface.

Preparing surfaces properly is essential to achieving a smooth, durable paint finish. Before you even open a can of paint, you need to establish the surface is clean, primed, and properly sanded. This foundation allows the paint to adhere correctly, resulting in a professional-looking result that lasts. One of the key considerations during surface prep is selecting the right tools, especially your brushes. Different brush types serve different purposes, so choosing the correct brush for your project can make all the difference. For example, natural bristle brushes work well with oil-based paints, providing a smooth finish, while synthetic brushes are better suited for latex paints because they hold and distribute water-based paints efficiently. Using the wrong brush type can lead to streaks, uneven coverage, or brush marks that are difficult to correct later. Additionally, you need to confirm paint compatibility. Not all paints work well on every surface, and some may require specific primers or preparation steps. For instance, glossy surfaces often need to be sanded or primed with a bonding primer to guarantee the paint sticks properly, while porous surfaces like drywall or raw wood might need sealing first to prevent paint absorption and uneven color.
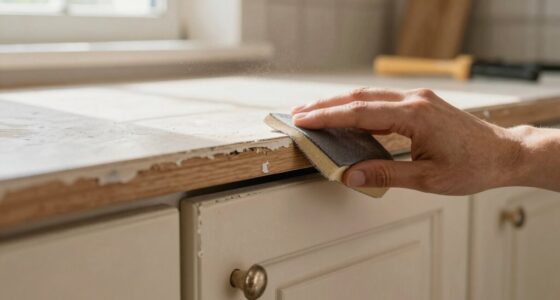
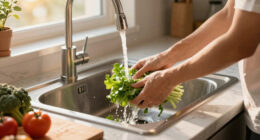
Cleaning the surface thoroughly is your first step. Dirt, grease, and dust can prevent proper adhesion, so wipe down walls or wood surfaces with a damp cloth or a gentle cleaner suited for the material. For greasy spots or stains, a degreasing solution may be necessary. Once the surface is clean, inspect it for any imperfections such as holes, cracks, or peeling paint. Filling these with spackle or joint compound and letting it dry guarantees a smooth surface. Sanding comes next; lightly sand rough patches, peeling paint, or glossy finishes to create a slightly rough surface that the primer and paint can grip. Use fine-grit sandpaper for a smooth finish, and always remember to remove dust with a tack cloth or vacuum before painting.
Priming is vital, especially on new or repaired surfaces, to promote paint adhesion and enhance durability. Choose a primer compatible with your paint type—oil-based primer for oil paints, water-based primer for latex paints—and apply it evenly. Proper surface preparation, including selecting the right brush types and guaranteeing paint compatibility, sets the stage for a flawless finish. When you follow these steps diligently, you’ll find that painting becomes more straightforward, and the results will look professional, lasting longer and resisting peeling or chipping.

Max Strip Painter's Prep | 22 oz | Pre-Painting and Refinishing Surface Cleaner | Water-Based Formula | Fast-Acting | Removes Grease, Oil, Dirt, Stains, Adhesive Residues, and Paint Splashes
MULTI-PURPOSE CLEANER: Max Strip Painter's Prep is a versatile pre-painting surface cleaner that removes grease, dirt, grime, adhesive…
As an affiliate, we earn on qualifying purchases.
As an affiliate, we earn on qualifying purchases.
Frequently Asked Questions
How Do I Remove Old Paint Without Damaging the Surface?
To remove old paint without damaging the surface, start with gentle methods like scraping with a plastic scraper or using a heat gun on low heat. For stubborn areas, apply a paint remover carefully, following the manufacturer’s instructions. Avoid harsh chemicals or aggressive scrapers that can cause surface damage. Patience is key; taking your time guarantees effective paint removal while protecting the underlying surface from damage.
What Tools Are Best for Sanding Different Surfaces?
You’ll want to match your sanding tools to the surface’s personality. For wood, go for sanding blocks or orbital sanders to master those delicate curves. For drywall, use fine-grit abrasive tools to avoid dusting your surroundings in chaos. Metal surfaces demand coarse-grit abrasive tools for aggressive removal. Remember, mastering sanding techniques with the right abrasive tools makes the surface smooth as silk—no matter how stubborn the old paint or rough the surface.
How Long Should Primer Dry Before Painting?
You should wait at least 1 to 2 hours for primer to dry before painting, but check the manufacturer’s instructions for exact drying time. Proper drying time guarantees good paint adhesion and a smooth finish. If you apply paint too soon, it may peel or chip later. Make sure the primer feels dry to the touch and is no longer tacky, giving it enough time to set properly.
Can I Use Household Cleaners to Prepare Surfaces?
You can use household cleaners to prepare surfaces, but choose the right ones and follow proper preparation techniques. Avoid harsh chemicals that might leave residues or damage the surface. Instead, opt for mild soap and water or a gentle degreaser for cleaning. Make sure to thoroughly rinse and dry the surface before priming or painting. Proper cleaning guarantees better adhesion and a smoother finish.
What Are Common Mistakes to Avoid During Surface Preparation?
Think of your surface as a blank canvas—avoid rushing, or you’ll invite a mess. Don’t ignore surface contamination or uneven textures, which can cause uneven paint and peeling. Skipping proper cleaning, neglecting to sand rough spots, or rushing priming can trap dirt or create bumps. Always inspect your surface carefully, prep thoroughly, and take your time to make sure a smooth, lasting finish—otherwise, imperfections will paint a story you didn’t intend.

Zinsser 286258 Bulls Eye 1-2-3 All Surface Primer, Quart, Gray
Interior/Exterior use on new or previously painted drywall, concrete, wood, masonry, metal and glossy or difficult surfaces
As an affiliate, we earn on qualifying purchases.
As an affiliate, we earn on qualifying purchases.
Conclusion
Now that you know the essential steps—cleaning, priming, and sanding—you’re almost ready to transform your space. But remember, the real magic happens when you apply your paint. Are you prepared to see the stunning results of your effort? Stay attentive to the surface’s final touch, because sometimes, it’s the smallest details that make all the difference. Get ready—your perfect finish is just one brushstroke away, and the best part is still to come.

Tonmp 6 Pack 220 Grit Superfine Sanding Sponge, Washable and Reusable Great for Pot Pan Brush Sponge Brush Glasses Wood Metal Sanding (220 Grit-6 Pack)
6 Pack 220 Grit Superfine Sanding Sponge, Washable and Reusable Sanding Blocks
As an affiliate, we earn on qualifying purchases.
As an affiliate, we earn on qualifying purchases.

Bates- Paint Roller Kit, 19 pcs, Roller Set with Microfiber Sleeves & Frame
Bates paint roller kit includes 19 essential pieces for home painting, prep, and cleanup projects.
As an affiliate, we earn on qualifying purchases.
As an affiliate, we earn on qualifying purchases.