
Proper site prep is key to building a stable, durable outdoor shed. Start by evaluating your soil and grading it away from the site to ensure proper drainage. Remove vegetation and level the ground with tools like a level, tamper, and shovel. For the base, options include gravel for good drainage or a concrete slab for heavy-duty stability. Designing the site carefully now helps prevent future issues—keep exploring for detailed tips.
Key Takeaways
- Conduct soil testing and clear debris to create a stable, level foundation for your shed.
- Ensure proper grading with a slope of 2-3 inches per 10 feet to direct water away from the shed.
- Use gravel or crushed stone layers with geotextile fabric beneath for optimal drainage and stability.
- Choose a durable base material like concrete, paving stones, or treated wood based on shed weight and budget.
- Regularly inspect and maintain drainage systems and foundation to prevent water pooling and foundation issues.

Goldshire 12 Units Permeable Pavers Gravel, Grass& Gravel Driveway System, Interlocked Pavers Gravel Grid Black PE Shed Base 1.6" Depth, 32 Sq Ft (12)
- Material: Made from 100% recycled plastic
- Units and Coverage: 12 units, 32 sq ft coverage
- Depth: 1.6 inches deep
As an affiliate, we earn on qualifying purchases.
As an affiliate, we earn on qualifying purchases.
Why Proper Site Prep Is Essential for Your Outdoor Shed

Proper site prep is crucial because it lays the foundation for a sturdy and long-lasting outdoor shed. Choosing the right foundation types depends on your soil conditions, making soil testing an essential first step. Soil testing reveals whether your soil is compacted, sandy, clayey, or prone to shifting, which influences your foundation choice. Without proper testing, you risk settling, shifting, or structural damage over time. A solid foundation ensures your shed remains level, stable, and protected from moisture and pests. Investing time in site prep prevents future problems and extends the lifespan of your shed. Remember, a well-prepared site creates a stable base that can withstand weather and environmental changes, making your shed safer and more durable for years to come. Additionally, understanding your soil type helps you select the most effective drainage solutions to prevent water pooling around your structure. Conducting a thorough soil analysis can also uncover potential issues before construction begins, saving you time and money. Proper site prep also involves ensuring adequate moisture management, which helps maintain the integrity of your foundation over time. Incorporating proper compaction methods further enhances stability and longevity of your shed’s foundation. For added durability, consider incorporating geotextile fabric beneath your base to improve separation and reinforcement.
How to Assess Your Site Conditions Before Building

How can you guarantee your site is ready for building? Start by evaluating your land. Conduct soil testing to check drainage and stability, ensuring the ground can support your shed. Remove any vegetation, including grass, weeds, and roots, to create a clean, stable base. Observe the slope of your site: is it level or does water tend to pool? Use the table below to evaluate key conditions:
| Condition | What to Look For | Action Needed |
|---|---|---|
| Soil testing | Drainage, compaction, stability | Amend soil or choose a different spot |
| Vegetation | Roots, grass, weeds | Remove thoroughly |
| Slope | Water runoff or pooling | Grade or adjust placement |
| Surface debris | Rocks, debris, uneven ground | Clear and level |
| Existing structures | Foundations, old posts | Remove or reinforce as needed |
Additionally, reviewing essential oils for site-related issues like mold or odors can help maintain a healthy environment around your shed area. Incorporating proper site drainage strategies can prevent future water damage and soil erosion, which is crucial for long-term stability. Understanding soil composition can help you select the best foundation type for your shed. Ensuring proper site preparation reduces the risk of future problems and creates a solid foundation for your shed. Taking the time to evaluate these conditions thoroughly before construction can save you time and money in the long run.
How to Level the Ground for a Stable Shed Foundation

To guarantee your shed stays stable, you need to level the ground properly. Start by evaluating how even your site is and create a clear leveling plan. Use the right tools to make the process accurate and efficient. Additionally, incorporating proper foundation options can further improve stability and longevity of your shed. Understanding soil composition and drainage can help you select the best foundation that prevents water accumulation and structural issues. For optimal results, understanding airless paint spraying tips can also help if you’re planning to paint or finish your shed with a smooth, professional look. Being aware of Free Floating concepts can assist you in choosing the best foundation that accommodates natural movement and prevents structural issues over time.
Assess Ground Levelness
Before you start building your shed, conducting an assessment of the ground for levelness is vital. Begin by inspecting the area for uneven spots, slopes, or dips. Check soil compaction by pressing a hand or tool into the soil; loose soil indicates poor compaction and may need reinforcement. Clear the site of vegetation removal, including roots and plants, to prevent future shifting. Use a level or a long straightedge to detect high and low spots across the ground. Mark any uneven areas with stakes or chalk. This assessment helps you determine what adjustments are needed to create a stable foundation. Properly evaluating ground levelness now ensures your shed will sit securely and reduces the risk of future settling or shifting. Additionally, understanding electric power generation options can be beneficial if you plan to set up lighting or small appliances in your shed later. Knowing how to address water drainage issues can also prevent water accumulation that might undermine your foundation.
Prepare a Leveling Plan
Once you’ve assessed the ground for levelness, it’s time to create a detailed leveling plan to ensure a stable foundation. Start by removing all vegetation and debris, which can interfere with soil compaction and create uneven spots. Clear the area thoroughly, then focus on soil compaction; firm the soil using a tamper or plate compactor to eliminate air pockets and create a solid base. Mark the high and low points, and plan to add or remove soil accordingly to achieve a level surface. Consider adding a gravel or crushed stone bed for drainage and stability. Your plan should specify how much soil to add or remove, ensuring every part of the site will support your shed evenly. A well-thought-out leveling plan prevents future shifting or settling.
Use Proper Tools
Using the right tools is key to achieving a level and stable ground for your shed foundation. With the proper equipment, you can efficiently prepare the site and guarantee your shed remains sturdy over time. Essential tools include a landscape level, a tamper, and a shovel. The landscape level helps you check for evenness across the area, while the tamper compacts the soil to prevent shifting. A sturdy shovel assists in moving and shaping the ground, especially around garden decor and outdoor lighting fixtures. Consider also using a rake for fine leveling adjustments. Proper tool use assures a solid base, reducing future settling or shifting. Additionally, understanding Piercing Care and Hygiene and their recommendations can help you choose the right materials and techniques for your specific region. Ensuring early detection of issues during site prep can prevent costly repairs later. Understanding regional flavors and their impact on outdoor ambiance can inspire your shed’s design to complement your surrounding environment. Incorporating soil composition insights from geotechnical studies can further improve the stability of your foundation. With precision, your outdoor space will look better, and your shed foundation will stay stable, even as garden decor or outdoor lighting are added later.
Best Drainage Practices to Keep Your Shed Dry

Proper drainage is essential to keep your shed dry and prevent costly water damage. Start by ensuring the ground slopes away from your shed’s foundation, directing water runoff away from the structure. Installing a slight pitch of 2-3 inches per 10 feet helps water flow naturally. Incorporate gravel or crushed stone around the base to facilitate drainage and reduce soil erosion. Keep garden decor and outdoor lighting fixtures away from the shed’s perimeter to avoid trapping moisture and creating damp spots. Consider adding a drain spout or gutters to channel rainwater away efficiently. Regularly inspect and clear debris from gutters and drainage paths. Good drainage not only prevents water buildup but also preserves your shed’s foundation, keeping your outdoor space functional and attractive. Additionally, using permeable paving materials around the shed can enhance water infiltration and reduce runoff. Proper grading and water management strategies are crucial for long-term protection of your outdoor structures. Ensuring proper soil grading around the shed can further improve water runoff and prevent pooling near the foundation.
Which Base Material Is Right for Your Shed? (Gravel, Concrete, or Other)

Choosing the right base material for your shed sets the foundation for durability and longevity. Your foundation options influence stability, drainage, and maintenance needs, making base material selection vital. Gravel is a popular choice for good drainage and ease of installation, ideal for those wanting a simple, cost-effective option. Concrete offers a solid, durable foundation perfect for heavier structures and long-term stability but requires more preparation. Other options include paving stones or pressure-treated wood, which can work well in specific situations. When selecting your base material, consider factors like load capacity, drainage requirements, and budget. The right choice ensures your shed remains level, properly drained, and protected from ground moisture, providing a sturdy, lasting foundation tailored to your needs.
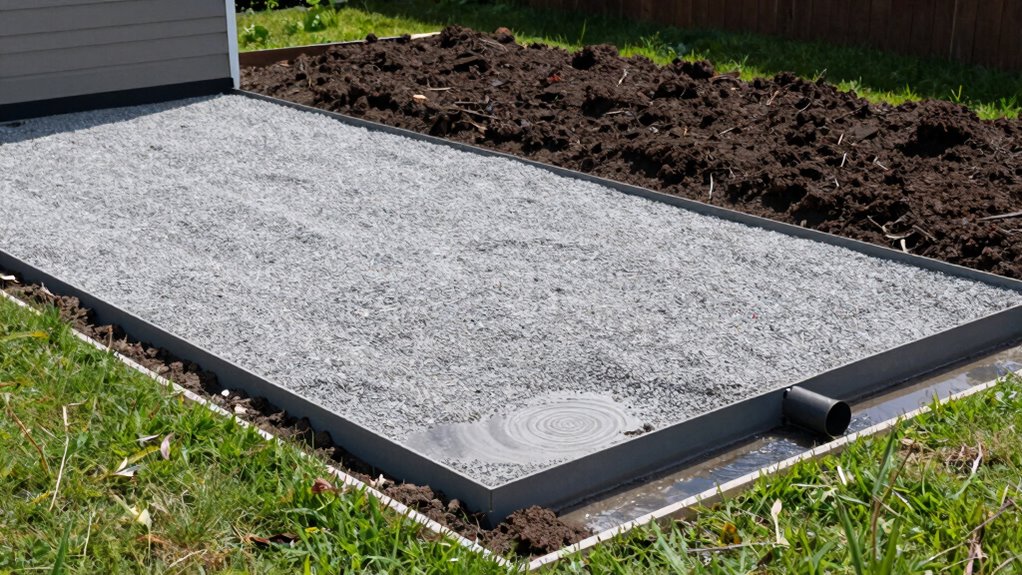
How to Build a Gravel Pad for Easy Maintenance and Stability

Building a gravel pad starts with choosing the right type of gravel that provides stability and drainage. Next, you need to prepare the site by clearing, leveling, and compacting the ground properly. Finally, you’ll install the gravel in layers, ensuring a solid, maintenance-friendly foundation for your shed.
Choosing the Right Gravel
Selecting the right gravel is essential for creating a stable and low-maintenance foundation for your outdoor shed. Your gravel selection impacts drainage, stability, and ease of maintenance. Opt for crushed stone or gravel with angular edges, which lock together better than rounded stones. To guarantee proper gravel layering, start with a base layer of larger stones for stability, then add a middle layer of medium gravel for drainage, finishing with a top layer of finer gravel for a smooth surface. Consider these factors:
- Size and angularity of gravel particles
- Proper compaction techniques
- Consistent thickness of each layer
Choosing the right gravel and layering it correctly helps prevent shifting, water pooling, and future repair needs, making your shed foundation durable and easy to maintain.
Preparing the Site Properly
To make sure your shed has a stable and low-maintenance foundation, you need to prepare the site properly before laying the gravel. Start by clearing the area of any grass, weeds, or debris, ensuring the ground is level. Incorporate garden landscaping techniques to create a smooth, even surface that complements your outdoor space. Consider the placement of outdoor furniture nearby, ensuring the shed won’t interfere with existing pathways or seating areas. Excavate the site to a depth of about 4-6 inches, removing any soft or uneven spots. This preparation allows for proper drainage and prevents shifting over time. A well-prepared site minimizes future maintenance, keeps your shed stable, and integrates seamlessly into your landscape design.
Installing the Gravel Pad
Once your site is properly prepared, you can begin installing the gravel pad, which provides a stable base for your shed. Choosing the right foundation materials and gravel selection is vital for durability and drainage. Start by spreading a layer of crushed gravel or gravel mix that compacts well. Make sure the gravel is evenly distributed and level across the area. To enhance stability and prevent shifting, consider adding a geotextile fabric beneath the gravel. Proper compaction is essential to create a firm, level surface. Remember to maintain a slight slope away from where your shed will sit to facilitate water runoff. These steps help guarantee your gravel pad remains stable and easy to maintain over time.
Should You Use a Concrete Slab? Pros, Cons, and Installation Tips

Deciding whether to use a concrete slab for your outdoor shed depends on several factors. Concrete as a foundation material offers durability and stability, making it ideal for long-term use. It provides a solid base that minimizes shifting and settling over time. However, consider drainage solutions, as a flat concrete slab can cause water pooling if not properly graded or if drainage isn’t managed. Installing a slab requires careful planning to ensure proper slope for runoff and prevent water damage. Pros include a maintenance-free surface and increased longevity. Cons involve higher costs, longer installation time, and potential difficulty in future modifications. If you want a low-maintenance, permanent foundation, a concrete slab might be the right choice. Otherwise, explore alternative options suited to your climate and shed needs.
Tools and Materials Needed for Shed Site Preparation

Preparing your shed site requires gathering the right tools and materials to guarantee a smooth and efficient process. Your tool checklist should include essentials like a level, shovel, and post-hole digger. These will help you accurately assess the foundation options and prepare the ground properly. You’ll also need materials such as gravel or crushed stone for the base and possibly concrete or paving blocks, depending on your foundation choice. Having these items ready assures you can address leveling, drainage, and base installation without delays. Consider the specific foundation options for your shed, as each may require different preparations. Being prepared with the right tools and materials makes the entire site prep faster, safer, and more reliable.
Common Mistakes When Preparing Your Site: and How to Avoid Them

One common mistake is skipping a thorough site inspection, which can lead to overlooked issues. Ignoring proper drainage planning can cause water problems and damage your shed over time. Using inadequate base material might result in an unstable foundation that won’t support your shed properly.
Skipping Site Inspection
Have you ever skipped a site inspection and later regretted it? Ignoring this step can lead to surprises that disrupt your project. Without proper inspection, you might overlook uneven terrain, hidden underground utilities, or drainage issues that affect your garden decor plans or interior design ideas for the shed.
To avoid costly mistakes:
- Missed slopes or dips that cause water pooling
- Underground cables or pipes that could be damaged
- Unsuitable soil conditions for a stable foundation
Skipping inspection can result in setbacks, extra costs, and an unstable shed. Taking the time to carefully evaluate the site guarantees your project runs smoothly and your shed becomes an attractive, functional addition to your outdoor space. Don’t skip this vital step.
Ignoring Drainage Planning
Ignoring drainage planning can cause serious issues down the line, leading to water pooling around your shed and damaging the foundation. Proper stormwater management is essential to prevent water from seeping into or eroding the base. If you skip gutter installation or neglect to direct runoff away from the shed, you risk creating a constant damp environment. Guarantee your site slopes away from the structure to facilitate natural drainage. Consider installing gutters to catch rainwater and channel it to designated drainage areas. Without these measures, standing water can weaken the foundation over time, cause mold, or lead to wood rot. Addressing drainage early helps protect your shed’s longevity and reduces costly repairs later on. Proper planning makes your outdoor shed more durable and easier to maintain.
Using Inadequate Base Material
Choosing the right base material is essential for a stable and durable shed foundation. Using inadequate base material can lead to foundation issues and compromise soil stability. When you select improper gravel, crushed stone, or dirt, it may shift or settle unevenly over time. This causes your shed to become unstable, crack, or sink. To avoid these problems, ensure the base material is well-draining and compacted properly.
- Using soil that retains moisture, leading to poor drainage and instability
- Choosing a mix that doesn’t compact well, resulting in shifting foundations
- Skipping proper leveling, which causes uneven load distribution and foundation failure
Proper base material supports your shed’s longevity by maintaining consistent soil stability and preventing costly repairs.
Tips to Ensure Long-Lasting Stability and Drainage for Your Shed

To guarantee your shed remains stable and drains properly over time, start by preparing a solid foundation. Ascertain the ground is graded away from the shed to prevent water pooling, which can damage the base. Use a level surface, and consider adding gravel or crushed stone beneath your base for better drainage. Installing outdoor lighting around the shed can help you monitor and maintain drainage after storms. Keep garden ornaments away from the shed’s perimeter to avoid trapping moisture or blocking airflow, both of which can compromise stability. Proper drainage directs water away from the shed, reducing the risk of shifting or settling. Regularly inspect the foundation and drainage system, making adjustments as needed to maintain long-lasting stability and proper water runoff.
Frequently Asked Questions
How Do I Choose the Best Location for My Shed?
You should choose a site with good sunlight exposure to keep your shed dry and prevent mold. Opt for a level area that’s easily accessible and away from large trees or roots that could interfere later. Consider site selection for drainage, ensuring water won’t pool around your shed. Pick a spot that offers convenient access to your yard and is protected from harsh weather, making maintenance easier.
What Permits Are Needed for Outdoor Shed Installation?
Permits promote proper placement and prevent problems. You’ll want to check permit requirements early, ensuring you meet local zoning regulations and building codes. Usually, smaller sheds under a certain size might not need permits, but larger structures or those near property lines often do. Contact your local building department or zoning office to confirm specifics. Staying compliant keeps your shed safe, legal, and hassle-free, helping your project progress smoothly.
How Often Should I Inspect and Maintain the Shed Foundation?
You should inspect your shed foundation at least twice a year, ideally in spring and fall. During each foundation inspection, check for signs of shifting, cracks, or uneven surfaces. Keep a maintenance schedule to address minor issues promptly, like leveling or drainage problems. Regular maintenance helps prevent major damage, prolonging your shed’s lifespan. By staying proactive, you guarantee your foundation remains solid, safe, and secure over time.
Can I Build a Shed on an Existing Concrete Slab?
Picture a sturdy concrete slab as your foundation—yes, you can build a shed on it. But first, inspect for cracks or damage, and perform concrete repair if needed. Reinforce the slab with proper slab reinforcement to guarantee stability. This prep creates a solid base, preventing future issues. With careful assessment and reinforcement, your shed will stand firm on that existing slab, saving time and effort.
What Are Eco-Friendly Options for Shed Site Prep?
You can choose eco-friendly drainage solutions like gravel or permeable pavers, which allow water to flow naturally and prevent runoff. Use sustainable materials such as recycled crushed concrete or reclaimed wood for your shed base. Opt for biodegradable weed barriers to reduce plastic waste. These eco-friendly options help protect the environment while providing a stable, well-drained foundation for your shed, making your project both sustainable and practical.
Conclusion
Proper site prep transforms your outdoor shed into a fortress that withstands the harshest weather. By leveling, ensuring good drainage, and choosing the right base, you’re building a foundation so solid it could hold up against a tornado! Take your time with each step, avoid common mistakes, and you’ll enjoy a sturdy, long-lasting shed that stands tall and proud for years to come. Your perfect outdoor sanctuary starts with a well-prepared site—so get started today!