TL;DR
Moving your AI rig into a closet or small space can drastically cut noise. Key is balancing soundproofing, placement, and ventilation—foam alone won’t cut it. Focus on sealing gaps, strategic placement, and airflow for best results.
Ever tried working next to a noisy gaming PC or a high-powered AI rig? It’s like having a jet engine in your room. But what if the secret to silence isn’t more foam or extra panels? It’s about where you put the rig and how you set up the space. Learn more about acoustic setup.
This guide cuts through the noise — literally — by showing you how to tame sound with smart placement, effective dampening, and clever use of your closet. Whether you’re building a vocal booth or just want a quieter workstation, understanding the real tricks makes all the difference. Explore acoustic treatment tips.
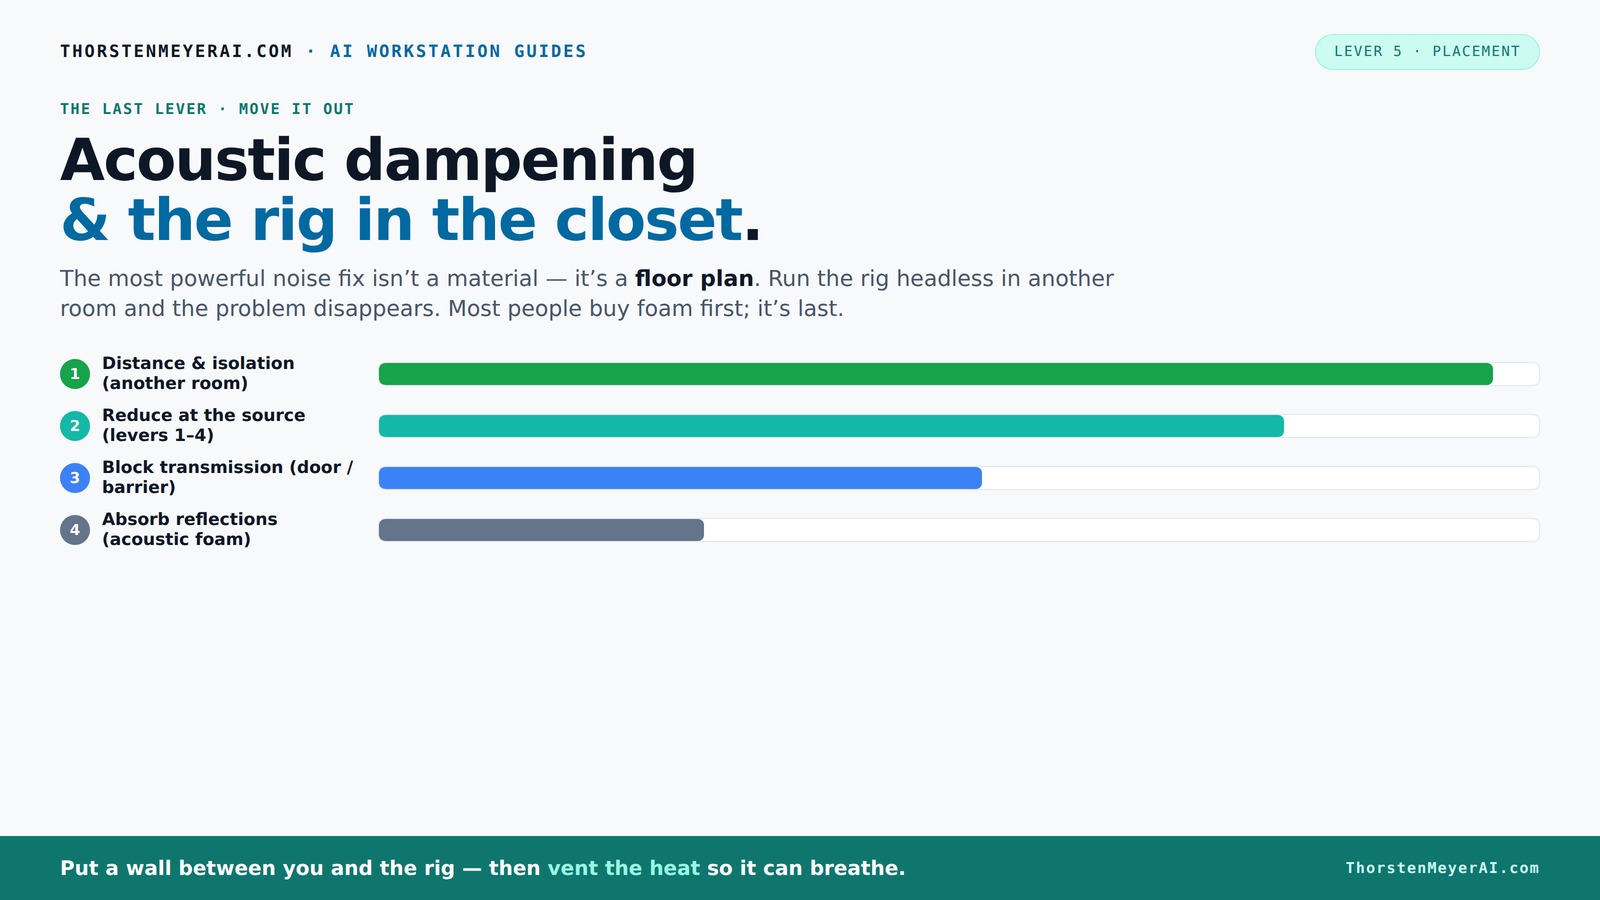
Acoustic dampening
& the rig in the closet.
The most powerful noise fix isn’t a material — it’s a floor plan. A rig you can’t hear because it’s in another room beats any amount of foam. Tap the approaches in Part 1 to see what actually works.
(another room)
(levers 1–4)
(door / barrier)
(acoustic foam)
Contain the noise, not the heat
Key Takeaways
- Moving your rig into another room or closet drastically reduces noise and heat issues.
- Effective ventilation in enclosed spaces prevents overheating and maintains system performance.
- Placement of acoustic panels at reflection points is more impactful than just adding more foam randomly.
- Sealing gaps and leaks around doors, vents, and outlets cuts noise transmission significantly. See how to improve soundproofing.
- Balancing absorption and reflection preserves natural sound while controlling echo and muddiness.

Focusound 52 Pack Acoustic Foam Panels 1" x 12" x 12" Sound Proof Foam Panles Soundproofing Noise Cancelling Wedge Panels for Home Office Recoding Studio with 300PCS Double-Side Adhesive
- Soundproofing Design: Triangular grooves for noise absorption
- Includes Adhesive Tape: 300pcs double-sided adhesive for easy installation
- Easy Shape Recovery: Soak in water to restore shape
As an affiliate, we earn on qualifying purchases.
As an affiliate, we earn on qualifying purchases.
Why Distance and Isolation Are Your First Line of Defense
Distance beats everything. If your rig lives in another room, the noise you hear is drastically reduced—even if the machine is loud enough to shake the walls. Think about it: a 600W GPU rig in a separate closet, connected over a good network, is way quieter at your desk than on your desk.
Moving the machine away doesn’t just cut noise; it also reduces heat, making your setup safer and more efficient. This is why the most effective fix is often the simplest—just put the rig where sound doesn’t bother you.
For example, I set my AI server in the basement, and I SSH into it. My workspace stays silent, and the rig roars in the background without bothering me. It’s the ultimate win.
The 'Rig in the Closet' Setup — How to Make It Work Without Cooking Your Hardware
Placing your high-power rig in a closet sounds perfect—quiet and out of sight. But beware: heat buildup is the enemy of 24/7 rigs. A sealed closet traps heat, causing your machine to throttle, fans to scream, and your hardware to wear out faster.
So, a closet setup only works if you give it breathing room. Think: active ventilation, exhaust fans, or even ducted airflow. You need a way for hot air to escape, or your rig will turn into a sauna.
For example, adding a quiet exhaust fan with a thermostat switch keeps the temperature stable. That way, your rig stays cool and quiet, even in a closet.
Want to dive deeper? Check out this detailed guide on how to reduce heat and noise in a high-power AI workstation.
Acoustic Treatment vs. Soundproofing: What You Really Need
Here’s the big truth: acoustic dampening and soundproofing aren’t the same. Acoustic treatments, like foam panels, absorb sound reflections inside a room, making it less echoey. Soundproofing, on the other hand, blocks sound from leaking out or in.
In a closet, your goal is usually to keep noise inside or outside from escaping. If you want to record clean vocals, focus on sealing gaps and adding dense materials. If your goal is to stop your rig’s noise from bothering neighbors, you need barriers and ventilation.
For instance, sealing cracks with weatherstripping and adding a dense drywall layer with damping compound can cut noise significantly—much more than foam alone.
Research shows that combining absorption with proper sealing yields the best results in small spaces for soundproofing.
Placement Secrets: Where to Put Panels for Maximum Noise Reduction
Placement is king. Acoustic dampening works best when panels go where sound bounces. In a tiny closet or booth, identify the first reflection points—these are spots where sound hits your ears or mic first.
For a vocal booth, put panels behind the mic and on the side walls facing the speaker. Use a mirror trick: position a mirror along the wall, and where you see the microphone’s reflection is where you need treatment.
Vertical reflections matter too. Mount panels on the ceiling above your head or recording spot to tame echoes bouncing upward.
For example, in my closet booth, I put foam panels on the side walls at reflection points and a bass trap in the corner for low-frequency muddiness. Learn about placement strategies.
How to Silence a Noisy Door, Vents, and Outlets
Gaps around doors, vents, and outlets are sneaky noise leaks. The first fix? Seal every crack with weatherstripping or acoustic sealant. Even tiny gaps let sound slip through.
For vents, install duct mufflers or soundproof vent covers. Outlets can be sealed with acoustic gaskets or foam behind the faceplate.
For example, I used weatherstripping on my closet door and added a draft blocker. The difference was night and day. Now, the noise stays trapped inside, and my recordings are cleaner.
These small tweaks keep your space tight and quiet, without big renovations.
The Best Way to Handle Low-Frequency Buildup in Small Spaces
Low-frequency hums—those deep rumbles—are the toughest. They travel through air and solid structures, making them hard to tame with foam alone. The fix? Bass traps and strategic placement.
In a small closet or booth, install bass traps in corners where low frequencies tend to pile up. These traps absorb the deep rumble and prevent it from bouncing around, creating a cleaner sound.
For example, I added foam bass traps in the corners of my closet booth, reducing muddiness and making vocals clearer.
To go further, consider using tuned bass traps or a small enclosure with active cooling, which can help cancel out low-end resonances and maintain a balanced sound profile.
Understanding the behavior of low frequencies in small spaces allows you to position traps effectively, avoiding the common mistake of under-treating these bass-heavy zones. Find out more about low-frequency treatment.
Balancing Absorption and Reflection for a Natural Sound
Too much absorption makes your room dead—no life, no vibe. Too little leaves echo and muddiness. The trick is to find the sweet spot.
In small spaces, treat the reflection points but leave some open areas. Use a mix of foam panels, diffusors, and perhaps a rug or curtain to keep the sound lively but controlled.
For example, I kept some space between panels and added a soft rug on the floor, which preserved some natural ambiance while reducing harsh echoes.
Think of your space as a balanced ecosystem: strategically absorb where reflections are strongest, and leave some space for lively sound. This balance prevents your recordings from sounding unnatural or overly dull, giving your voice or instrument a natural tone.
Experiment with placement and listen critically—your ears are the best guide to achieving a sound that feels right and translates well on different playback systems.
Frequently Asked Questions
Can I use blankets instead of proper acoustic panels?
Blankets and rugs can help reduce reflections and some sound transmission, but they won't match the effectiveness of purpose-built acoustic panels. For best results, treat reflection points with panels and use blankets as supplementary damping.
How much coverage do I need for a small closet booth?
Start with treating first reflection points—about 20-30% coverage—then add bass traps in corners. More coverage helps but overdoing it can deaden the space. Balance is key.
Should I treat the ceiling or the door first?
Prioritize treating the reflection points—so ceiling above your mic and the door gaps. Sealing leaks around the door is a quick, impactful fix, followed by targeted acoustic treatment.
Can I build a quiet, usable vocal booth without permanent construction?
Absolutely. Using portable panels, blankets, and reflection filters allows you to create a temporary or renter-friendly booth that reduces noise and echoes effectively without major renovations.
What’s the most overlooked aspect of a rig-in-the-closet setup?
Ventilation and sealing gaps are often overlooked. Without proper airflow, your system overheats, and noise leaks, defeating the purpose of a closet setup. Focus on airflow and airtight seals for best results.
Conclusion
Think beyond just foam panels. Your best noise control comes from smart placement, sealing leaks, and giving your rig room to breathe. A well-placed closet or a simple wall treatment can make your workspace quiet, clear, and more enjoyable.
Next time you hear that fan spin up, ask yourself: is it the placement, the ventilation, or just more foam? Chances are, a smarter setup beats endless soundproofing supplies every time.