Have you ever found yourself frustrated with a stubborn faucet aerator that just won’t budge? The tiny yet vital component of your sink can sometimes become a major nuisance when it comes to maintenance and cleaning. Fear not, as in this article, we will unveil the secrets of remove faucet aerator without tool. Imagine the satisfaction of achieving this task with just your hands and a few simple steps, saving both time and effort in the process.
Understanding Faucet Aerators
Faucet aerators are small attachment screens located at the tip of the faucet’s spout. They are designed to regulate and reduce the flow of water while also preventing splashing. Understanding how these small but crucial components work can help you maintain your faucet and make any necessary adjustments without the need for special tools.
Importance Of A Faucet Aerator
A faucet aerator serves several important purposes. It can help conserve water by limiting the flow, ultimately reducing water usage and lowering utility costs. Additionally, it controls the stream of water, minimizing splash and creating a smoother, more manageable experience. Furthermore, aerators mix air with water, which not only helps in maintaining water pressure but also will save water and energy. Ensuring your faucet functions optimally with a properly installed and well-maintained aerator can benefit both your wallet and the environment.
Common Issues With Faucet Aerators
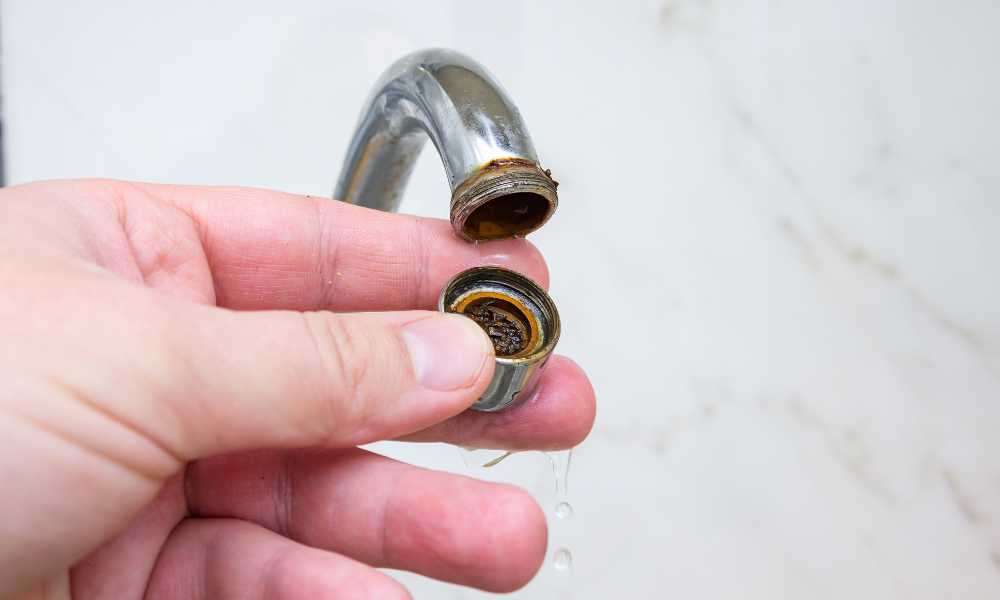
Over time, faucet aerators can accumulate mineral deposits and debris, leading to reduced water flow and uneven spray patterns. Sometimes, aerators may develop leaks or become loose, causing water to splash uncontrollably. It’s important to regularly inspect and clean your faucet aerator to prevent such problems from arising. Understanding how to remove a faucet aerator without specialized tools can help you address these common issues with ease.
Preparing To Remove Without Tools
Removing a faucet aerator without tools is a simple DIY task that allows you to clean or replace the aerator without the need for specialized equipment. This process requires you to take a few preparatory steps to ensure a smooth and hassle-free removal. By following these steps, you can successfully remove the aerator and maintain the optimal performance of your faucet.
Turning Off The Water Supply
Before starting the removal process, it’s crucial to turn off the water supply to the faucet. Locate the shut-off valves under the sink or near the main water line and turn them clockwise to shut off the water flow. This step is essential to prevent any water from spraying or leaking when you remove the aerator.
Gather Necessary Supplies
To simplify the aerator removal process, gather the necessary supplies in advance. You will need rubber gloves to protect your hands, a cloth or rag to provide a better grip, and a pair of pliers or adjustable wrenches to provide leverage when removing the aerator.
Step-by-step Process
When it comes to fixing a faulty faucet, removing the aerator is an essential step. However, you may not always have the necessary tools on hand. Fortunately, you can still remove the aerator without a tool by following a simple step-by-step process. In this guide, we’ll walk you through the process, from assessing the aerator type to finally removing it without the need for specialized tools.
Assessing The Aerator Type
Before the aerator is attempted to be removed, the type of aerator with which your faucet is equipped must be identified. Most commonly, faucets have either a male or female-threaded aerator.
Here’s a simple way to determine the type of aerator:
- Female Threaded Aerator: The threads are located inside the aerator.
- Male Threaded Aerator: The threads are located on the outside of the aerator.
Loosening The Aerator
Now that you have determined the type of aerator, it’s time to loosen it. Here’s how:
- Ensure the faucet handles are turned off to prevent any water flow.
- Use a cloth or rubber band to cover the aerator to protect it from scratches, and provide a better grip.
- For a female threaded aerator, use a pair of pliers to grip the aerator firmly and twist it counterclockwise to loosen it.
- If the aerator is male threaded, use the same counterclockwise motion to unscrew it directly without any tools, using only your hand strength.
Alternative Methods
When it comes to removing a faucet aerator without a tool, there are alternative methods that you can use. From being aided by common household items to receiving professional assistance. these methods can be employed to get the job done without the necessity for special tools.
To remove a recessed faucet aerator without a key, you can use a pair of pliers or an adjustable wrench to grip the aerator securely and twist it counterclockwise. It is important to wrap the jaws of the pliers or wrenches with masking tape to avoid scratching the aerator surface. Applying some lubricant such as WD-40 can also help loosen any debris or mineral buildup that may be causing the aerator to stick.
Using Household Items
If you don’t have a specialized aerator wrench, you can still remove a faucet aerator using everyday household items. Here’s how:
- Wrap a rubber band around the aerator for added grip.
- Use a pair of pliers to carefully unscrew the aerator counterclockwise.
- If the aerator is stuck, a small piece of cloth should be used to protect the aerator, and then it should be gripped with the pliers for more leverage.
Seeking Professional Assistance
If you find it difficult to remove the faucet aerator on your own. It’s best to seek the help of a professional plumber. They have the expertise and tools necessary to safely and effectively remove the aerator without causing damage to the faucet or plumbing system.
Frequently Asked Questions
Are all faucet aerators removable?
Yep!. But how they come off can vary. You’ll find that some screw on and off easily, while others might need a special tool. However, there might be a few models out there where the aerator is built into the faucet and isn’t meant to be taken off.
How do you remove a faucet aerator that doesn’t unscrew?
If you’ve got a stubborn aerator that won’t budge, no worries! You can try using a pair of pliers. But here’s a tip: wrap a cloth around the aerator first to protect it from getting scratched up. If it’s still not moving, applying some penetrating oil can help loosen it up. Just give it a bit of time to work its magic before trying again.
How do you clean a faucet aerator without removing it?
Want to clean it but don’t want to take it off? No problem! Just fill a plastic bag with some vinegar and tie it around the faucet so the aerator is soaking in the vinegar. Let it sit for a few hours or even overnight if it’s gunky. Afterward, just turn on the water to flush out any loosened debris. Voila!
Why is it important to remove and clean a faucet aerator?
Well, cleaning your aerator is key to keeping your water flowing smoothly. Over time, stuff like sediment and mineral deposits can build up and slow down the water flow or mess with the water pressure. Plus, keeping it clean can help reduce water waste and ensure you’re getting nice, clean water to use.
Conclusion
By following the steps outlined in this article, you can easily clean or replace your aerator to improve water flow and efficiency in your kitchen or bathroom. Remember to exercise caution and take your time when attempting this DIY project to avoid damaging the aerator or the faucet itself. With a little patience and effort, you can successfully remove the aerator using household items like pliers or tape. Try out these methods today and enjoy improved water pressure in your home!


